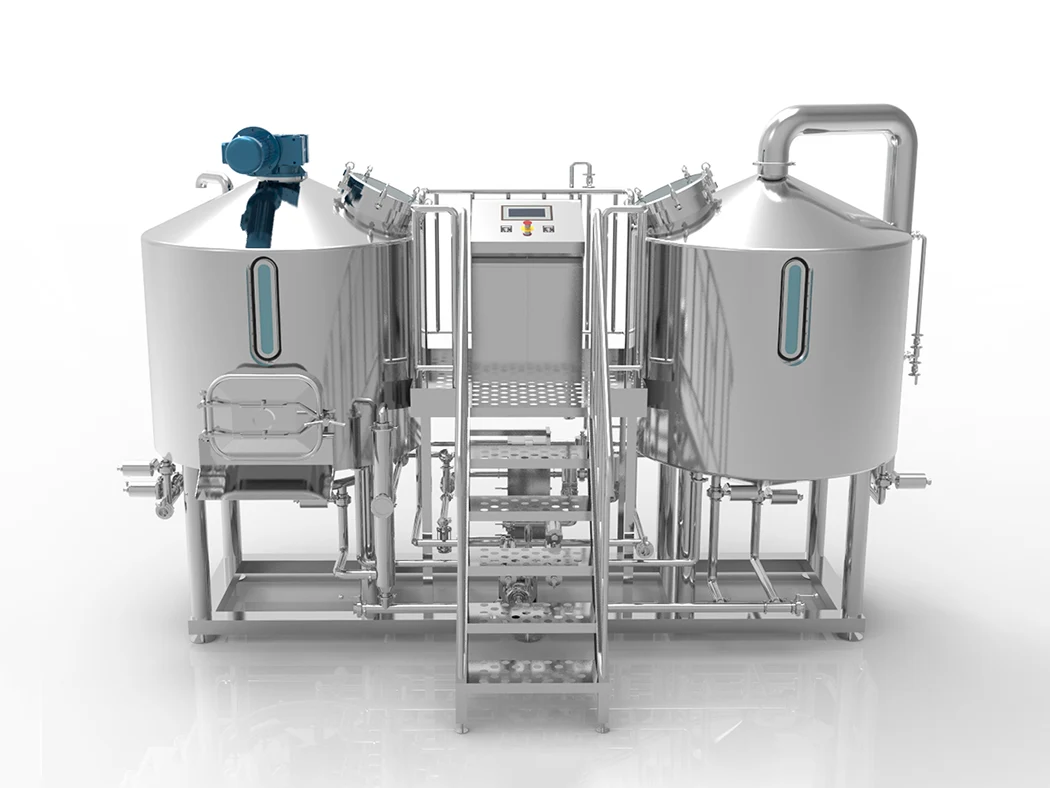
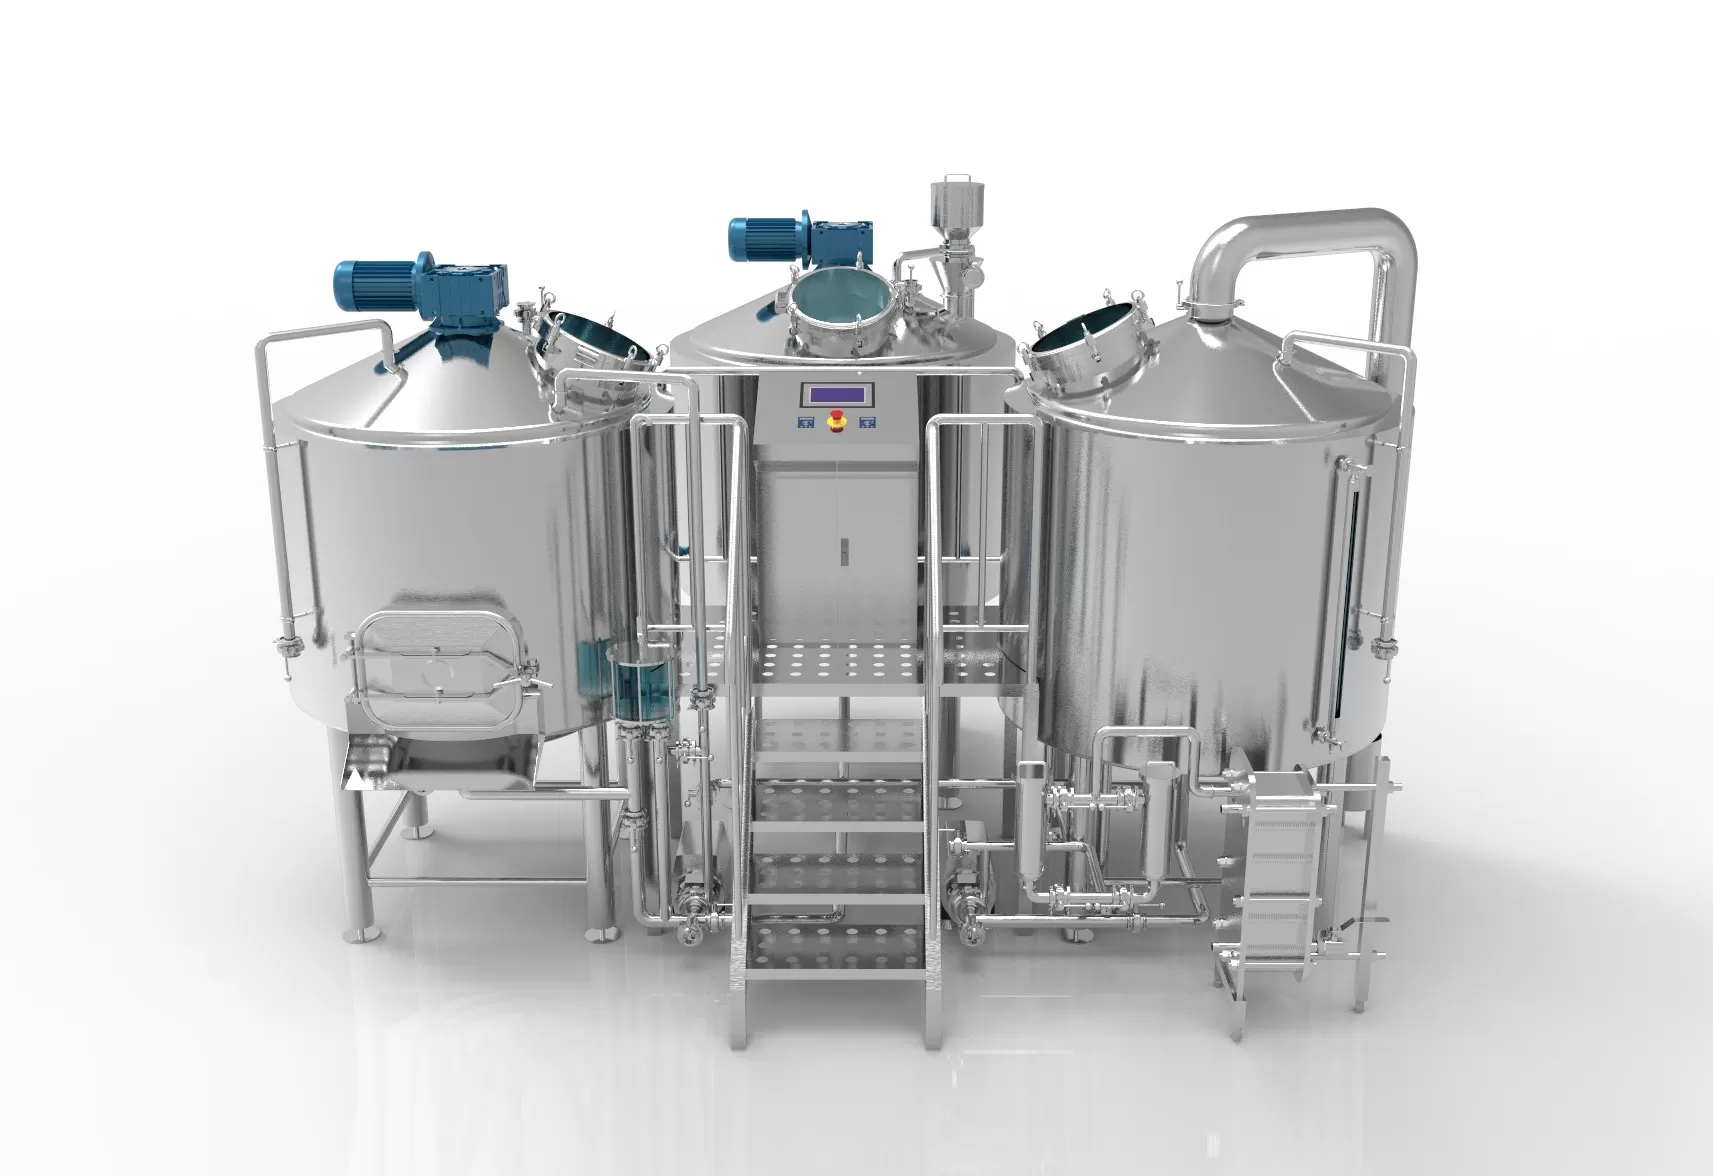
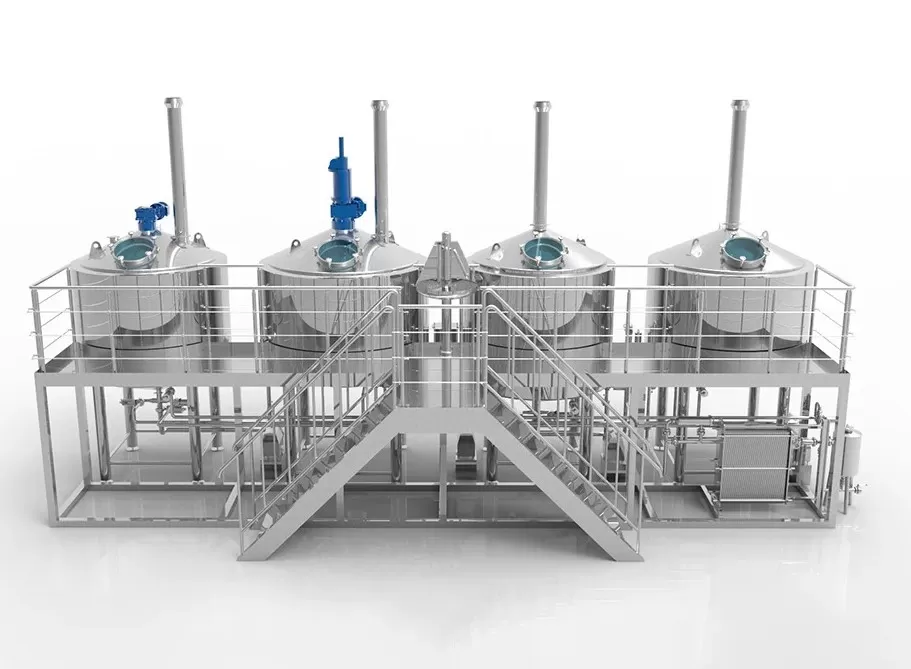

The first step to getting started with craft beer brewing is choosing to own a craft beer brewing kit. Brewing your beer at home is much easier than most people think. When you brew at home, you can create a very simple operation in a spare room of your home or your garage. The brewing equipment package you need is affordable and won’t take up a lot of space. Whether you’re a beginner or a brewmaster looking to update your brewing equipment, Micet Group has a beer-making kit to suit your experience level and interests.
수제맥주란 무엇이고 어떻게 양조하나요?
I know this may sound basic, but to be a craft brewer we need to understand the most basic craft. Craft beer is composed of 4 ingredients – water, malt, hops and yeast.
수제 맥주 양조 초보자 가이드:
- 재료 준비 및 장비 준비(청소)
- 재료를 넣고 섞는다
- 효모 추가
- 맥주를 약 14일 동안 발효시키세요.
- 맥주가 준비되었는지 테스트
- 병입 맥주
- 양조된 배치를 즐겨보세요!
- 청소 + 소독 장비
The beer brewing process for beginners can take about 21 to 28 days, depending on the style of beer. you’ll need about 20 minutes to combine the ingredients and then let them soak for about seven days. After that, the beer is bottled (which takes about 40 minutes) and allowed to ferment. Once the beer has been in the bottle for two weeks, you can chill it and enjoy it.

초보자가 맥주를 양조하려면 어떤 스타터 키트가 필요합니까?
스타터 키트에는 발효 버킷, 병입 버킷, 병입 막대, 캡퍼, 자동 사이펀, 이송 튜브, 비중계, 에어록 및 소독액이 포함되어야 합니다. 양조 키트 외에도 양조할 수 있을 만큼 큰 냄비/주전자와 프로판 버너도 필요합니다. 어떤 사람들은 주방 스토브를 사용하지만 7-8갤런 주전자를 담을 만큼 크지 않을 수도 있습니다. 디지털 온도계도 편리하며 담그는 온도와 피칭 온도를 측정하는 데 꼭 필요한 필수품입니다. 수제 맥주 양조를 시작하기 전에 올바른 맥주 장비와 재료가 필요합니다. 초보자를 위한 맥주 양조의 핵심 사항은 다음과 같습니다.
- 맥주 키트
- 4+ 갤런 포트
- 발효 탱크
- 공기 잠금 장치 또는 플러그
- 선반 지팡이/자동 사이펀
- 병입스틱
- 온도계
- 디지털 규모
- PVC 파이프(⅜인치 맥주 파이프)
- 병
- 병뚜껑 및 캡핑 기계
- 헹굼이 필요 없는 세척제 및 식품 등급 소독제
For your first time brewing beer at home, a starter kit is the right choice because it comes with all the equipment and ingredients you need to brew your first batch of beer. We don’t recommend all-grain brewing for beginners, as things like partial mashing and all-grain brewing need more advanced techniques.
새로운 홈 브루어를 위한 맥주 키트에 대한 조언
Micet은 양조에 새로운 가정 양조업자에게 유용한 몇 가지 사항이 있다고 생각합니다. 다음은 참고할 수 있는 몇 가지 제안 사항입니다.
- Kettle: Like many winemakers, buy a starter equipment kit. Once you have it, all you need is a brewing kettle and ingredients, and you’re ready to brew.
- 맥아 냉각기: 맥주 오염 가능성을 줄이는 가장 좋은 방법 중 하나는 맥아즙을 최대한 냉각하여 해로운 박테리아가 선호하는 위험한 범위 밖으로 온도를 낮추는 것입니다. 많은 새로운 가정용 양조업자는 양조 냄비를 큰 욕조나 욕조의 얼음 욕조에 담그는 방식으로 이를 수행합니다. 맥아즙 냉각기를 구입하면 많은 시간을 절약하고 번거로움을 없애며 오염 위험을 줄일 수 있습니다.
- 자동 사이펀: 주전자에서 주 발효기로 옮기거나 랙에서 술통으로 옮기는 경우 자동 사이펀이 주요 도구입니다. 대부분의 보급형 추출 설정에는 5/16인치 자동 사이펀이 포함되어 있습니다. 구매 시 일반적으로 $10 정도의 비용이 듭니다.
- 사워도우 스타터: 효모 튜브, 효모 한 봉지 또는 건조 효모 패키지를 구입하든 사워도우 스타터를 만드는 것은 발효 주기가 좋은 시작을 보장하는 좋은 방법입니다. 완료하는 데 약 20분밖에 걸리지 않으며 강력하고 활동적인 1차 발효 단계를 얻을 가능성이 높아집니다. 또한 효모가 건강하고 풍부할 때 설탕이 알코올로 더 빨리 전환되기 때문에 오염 가능성이 줄어듭니다.
- 맥아즙 산소화: 뜨거운 단계가 완료되고 맥아즙이 냉각되면 효모가 활발한 발효를 시작하는 데 필요한 산소가 거의 남지 않습니다.
- Use a blow tube: Using a blow tube instead of an airlock doesn’t mean your beer won’t taste great. It means there won’t be any mess on your hands. Place one end of a tube into the top of the plug and dip the other tube into the disinfectant, and you’re good to go. Some Clawson may get into your solution bucket through the tubing, so it’s not a bad idea to check and replace the sanitizer a few times a day.
- Mash Bag: Without a mash tun, they couldn’t start brewing all-grain beer. Incorrect! If you have a quality sleeping bag, place the mash in a brew kettle (heat it!) and wrap it in the sleeping bag for 60 minutes. You’ll be surprised at how well the temperature is maintained. Check after about 15 minutes and add boiling water if you need to raise the temperature.

초보자를 위한 양조의 5가지 중요한 단계
홈 브루잉은 돈을 절약하고 다양한 종류의 맥주를 즐길 수 있는 재미있는 방법입니다. 첫 번째 맥주를 양조하기 전에 장비가 필요합니다. 홈브루잉 벤처 초기에 올바른 장비에 투자하면 많은 골치 아픈 문제, 좌절, 재료 낭비를 줄일 수 있습니다.
- 깨끗하게 유지하세요: 홈브루어에게 가장 중요한 규칙은 특히 냉각 과정에서 위생입니다. 오염 위험을 줄이기 위해 맥아즙을 식힐 수 있는 청소가 쉬운 코일 침지 냉각기를 판매하세요.
- 이스트 준비하기: 첫째, 이스트를 몇 달 동안 냉장고에 넣어두지 마세요. 둘째, 효모가 제 역할을 할 수 있도록 정확한 양의 영양분과 산소를 공급해야 합니다. 효모가 만족하면 더 좋은 맥주를 얻을 수 있습니다.
- 난로 근처에 두지 마세요. 끓일 때 주방이 엉망이 될 수 있습니다. 대신, 맥주를 데울 수 있는 프로판 버너와 파티오, 차고 또는 차도 공간을 사용하고, 주전자를 끓이거나 홉을 추가할 때 호스나 스프레이 병을 준비하세요.
- Buy a glass fermenter: Plastic fermenters are fine and work, but glass fermenters last longer, don’t leak, and are easier to sterilize.
- Alcohol content: Managing the higher gravity fermentation of stronger, higher alcohol content beers can be tricky when you’re starting out. If it’s too light, there’s less room for error because there’s no place to hide any flaws. Beginners should keep alcohol content in the 5% to 7% range.
수제 맥주를 양조하기 위해 따라야 할 단계
- 맥주 키트를 안전하게 보관하세요. 맥주 키트의 출현으로 처음으로 집에서 양조를 시도하는 모든 사람의 삶이 더 쉬워질 것입니다. 맥주 키트라고 하면 맥아 농축액과 효모가 포함됩니다. 여기에는 맥주를 양조하기 위해 발효 재료를 사용하는 방법에 대한 몇 가지 지침도 포함됩니다. 가능한 권장 성분에는 양조 설탕, 쌀 시럽 및 액상 맥아당 시럽이 포함됩니다.
- Prepare beer. Brewing beer begins with sanitizing and cleaning the equipment required in the process. After the equipment is sterilized, prepare two quarts of water, heat it to about 160 degrees Fahrenheit and remove the heat. If done, add the contents of the beer kit and cook according to the set instructions. With this kit, you’ll learn that it’s best to let the ingredients dissolve before putting the lid on. Once you have done this, you need to pour the contents into the cold water in the fermenter. Mix well again and allow fermentation to proceed at the recommended temperature.
- Watch the fermentation process. This is the process of turning malt into beer. The initial stages of beer fermentation can last several days, and the key to this step is to watch the temperature . So how do you know your beer is ready to be bottled? Now there are two ways to tell if it is ready for packaging. The first is to check the bubbles coming out of the lock; if no more than one bubble bursts per minute, it means it is ready. Another test is to check for yeast. If it’s at the bottom, it’s ready for bottling.
- 마지막 단계는 병에 채우고 붓는 부분입니다. 시작 과정에서 설탕이 맥주와 혼합되어 발효를 촉진합니다. 이제 맥주를 프라이머 버킷으로 옮기고 설탕을 넣고 섞습니다. 그러면 맥주를 병에 담을 준비가 된 것입니다.